Tuesday, January 10, 2012

The Couch That Got Away

I mentioned in my Thirty Before 30 Update recently that I found a couch I liked at a thrift store that I wanted to buy and re-upholster, but sadly it sold last week. You snooze, you lose, I guess!

So now, I introduce you to... The Couch That Got Away.


I loved the simple lines, the tufted cushions, the PRICE, and how incredibly soft and cushy comfortable it was.

I had dreams of re-upholstering it in a dark gray velvet-y fabric and removing the skirt to reveal the cute legs.

But it was not meant to be!

Still on the hunt... I ordered some swatches from fabric.com so I could try to be ready to order fabric when the time comes, but none of them were ideal for a couch... so I still need to find an affordable fabric option... and a couch. The hunt continues!

Have you ever scored a couch secondhand? Our current couch is a craigslist find that I am so, so, so over. :)

If you're new to Owl Really, welcome! Please check out my favorite posts and consider subscribing! :)

Monday, January 9, 2012

The Thrift Report: Children's Clothes and Other Fun Items


I hit my favorite thrift store and an estate sale last week and scored some really fun items. The estate sale was a little stressful thanks to pushy people, but I managed to find some great things.

I really want to find a way to create a little children's corner in my booth - not sure if it's possible since it's already cramped, but I will add these adorable clothes soon:


I also found this sweet musical jewelry box:


A well-loved owl that has been broken and glued back together... I didn't notice it was glued back together until I was taking photos! Woops! Also found a spiral notebook of party games, really fun gold stockings, and little Sleeping Beauty book. I also found a book about the Grand Old Opry which we gave to Andy's dad and a book from the 70s about Disneyworld which I gave to my friend Ryan whose family is Disney-obsessed. :) Got the apron pattern at the thrift store.


And I picked up this owl clock from the thrift store... any ideas on what to do about the missing eye on the little owl?


And I love stocking up on cheap Christmas items for next year! Found 2 boxes of Christmas cards, a little elf, and some really pretty Christmas stationery that is labeled "enclosure letter pad." I suppose they're for if you want to write way more than your Christmas card will allow!


Thanks for checking out my thrift report this week! I will be loading in a big bag to my booth soon! I also found a great deal on vintage glassware but they were all wrapped up so I'll take photos when I unwrap them at the booth!

If you're in Nashville, come see my booth every day at the Tennessee Antique Mall!

Linking to: Her Library Adventures and Apron Thrift Girl

If you're new to Owl Really, welcome! Please check out my favorite posts and consider subscribing! :)

Sunday, January 8, 2012

Downton Abbey Season 2 Premieres Tonight

image source

In case you haven't heard, Downton Abbey (season 2) starts tonight in America on PBS. Find out everything you need to know here and be sure to leave your comments and let me know what you thought of the season 2 opener!

I'm excited to go to Emily's and watch it! I watched season 1 online and I'm excited to watch it in real time with real people! I have watched the season 1 episodes countless times - they were my go-to Netflix choice whenever I wanted to watch or listen to something familiar.

Catch up on Downton Abbey Season 1 on Netflix or PBS.org if you haven't seen it already. It's amazing!

If you're new to Owl Really, welcome! Please check out my favorite posts and consider subscribing! :)

Saturday, January 7, 2012

The Furniture Hunt: I finally found what I'm looking for!

When you finally find what you've been looking for, it's ok to pay a little more for it and not stick to your thrifty, ridiculously cheap ways, right? It's ok to recognize that this kind of furniture doesn't come around all the time and it's ok to pay a little more... right??

I'm trying to convince myself not to be too cheap to pass this up. It's not expensive, it's just not thrift-store-cheap... and I am normally stuck in my thrift-store ways. When you shop at the Goodwill Outlet and leave with an armload for under $10, it's hard to pay full price for ANYTHING!

We're looking at the below table that I found on Craigslist today. I'm so excited!!


I have been coveting a vintage Danish-style dining table for a few years now. I can never find one that is real wood and in my price range. (Andy and I don't really want a laminate table so I'm hoping this one is real wood.)

I hope it works out. I can't wait to pick out fabric to recover the seats! And to have SIX chairs?? We have a 2 person pew pulled up to our current table (which I bought for $20 at a yard sale and it's very shabby) and a random chair I bought at an estate sale years ago and we used to have a pew chair (that I found on the side of the road) pulled up to it, but it is quite broken.

Actually, you can see a photo of our dining room from a previous post here.

Wish us luck!!!

If you're new to Owl Really, welcome! Please check out my favorite posts and consider subscribing! :)

Friday, January 6, 2012

Friday Freebie: Owl Really Photoshop Storyboards


I had no idea how to make collages in Photoshop when I first started getting serious about blogging and photography. I scoured the internet for free collages (also known as storyboards) and found some great ones that I used on and off, but I recently started making my own. They're very simple but I wanted to make them available for everyone to use because I know how hard it can be to find simple ones!

One of the collages!

All you have to do is click here to download a zip file that contains a .psd file of 5 different collage/storyboard layouts.


Open the Photoshop file and you'll see that each layout is separated into its own folder. Decide which layout you would like to use, disable the others, and drag your photos above the shapes/layers where you would like them to be. Right click the photo layer and click "create clipping mask," which will associate the image with that shape. You can then re-size your photo (be sure you have your photo layer selected, not the shape layer).

An example of one of my recent collages! (original post found here)

I'm definitely not a Photoshop expert but hopefully this makes enough sense that you can use these layouts and find them helpful!

Happy Friday!

Linking to: Free Pretty Things For You

If you're new to Owl Really, welcome! Please check out my favorite posts and consider subscribing! :)

Thursday, January 5, 2012

DIY: Giant Single Bloom Fabric Bouquet

flower, fabric flower, diy, bouquet, bridal bouquet, bridal bouquet alternative, make your own bouquet, make your own wedding bouquet, make your own bridal bouquet, organza, easy, no-sew, no sew

Are you having a budget wedding and slashing fresh flowers due to the cost? If so, you don't have to sacrifice style by sacrificing real flowers - here's how to make a (giant) Single Bloom Fabric Bouquet on a budget!

My Single Bloom Fabric Bouquet was just voted one of Ashley's Bride Guide's Top Bouquets of 2011!

flower, fabric flower, diy, bouquet, bridal bouquet, bridal bouquet alternative, make your own bouquet, make your own wedding bouquet, make your own bridal bouquet, organza, easy, no-sew, no sew


Supplies:
  • Sharp scissors
  • Sturdy fabric like canvas (tip: buy from the remnant section to save money)
  • White or Ivory Organza
  • Fabri-tac Permanent Adhesive
  • Bouquet Holder
  • Bouquet Collar
  • Coordinating fabric to cover your bouquet holder (optional)
  • Brooch, button, earring, etc (optional)
  • Small bit of lace (optional)

Step 1:

flower, fabric flower, diy, bouquet, bridal bouquet, bridal bouquet alternative, make your own bouquet, make your own wedding bouquet, make your own bridal bouquet, organza, easy, no-sew, no sew

Cut a circle from your sturdy fabric, which will be the base of your fabric flower. Match the size of your circle to the size of your bouquet collar. (See various kinds of bouquet collars.) When I made my original bouquet, I used a 10 inch bouquet collar. You probably want to err a little bit bigger than your bouquet collar - you can always cut some of it back. For the tutorial, I made a small version from a fabric sample.

Step 2:

flower, fabric flower, diy, bouquet, bridal bouquet, bridal bouquet alternative, make your own bouquet, make your own wedding bouquet, make your own bridal bouquet, organza, easy, no-sew, no sew

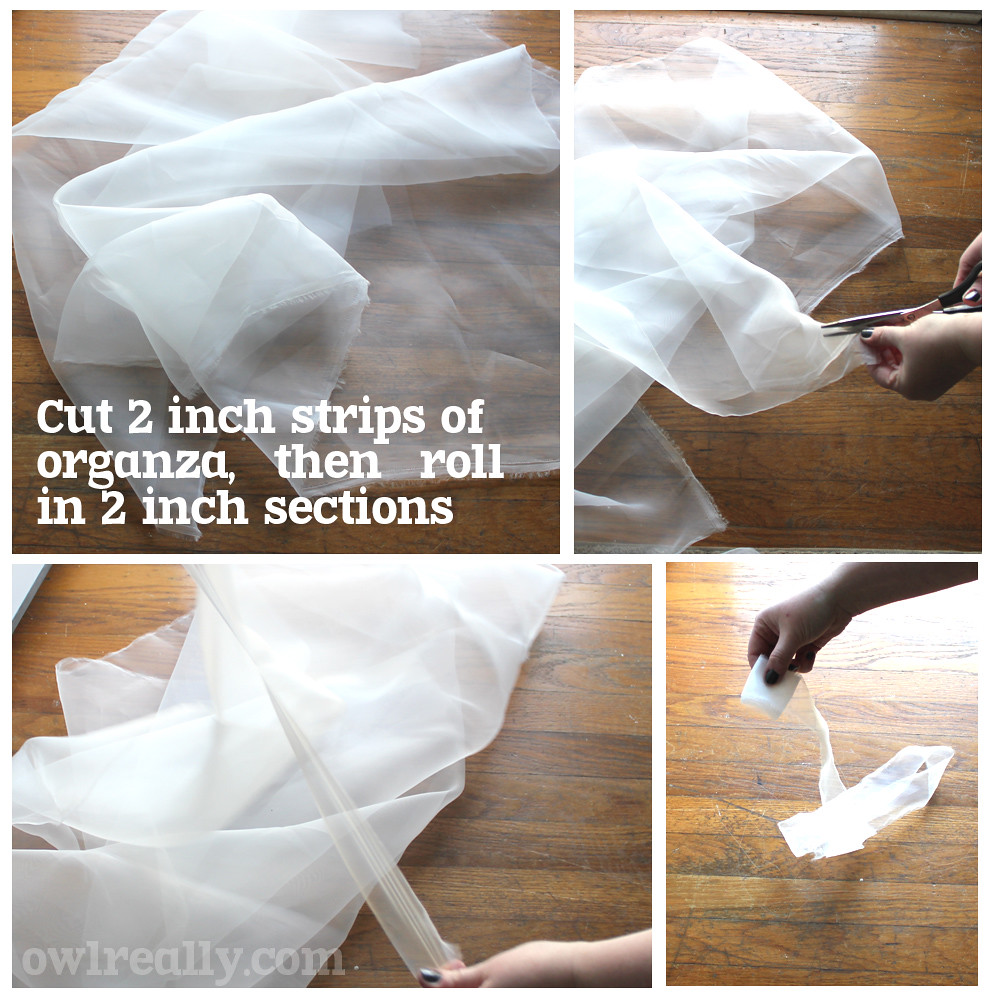
You may need up to 2 yards of organza, depending on the size and fullness of your flower.

Cut 2" strips of organza. You can make a small cut and then rip the rest of the fabric - so much easier than trying to cut straight all the way! Begin rolling the strip of organza, creating approximately a 2" roll.

Step 3:

flower, fabric flower, diy, bouquet, bridal bouquet, bridal bouquet alternative, make your own bouquet, make your own wedding bouquet, make your own bridal bouquet, organza, easy, no-sew, no sew

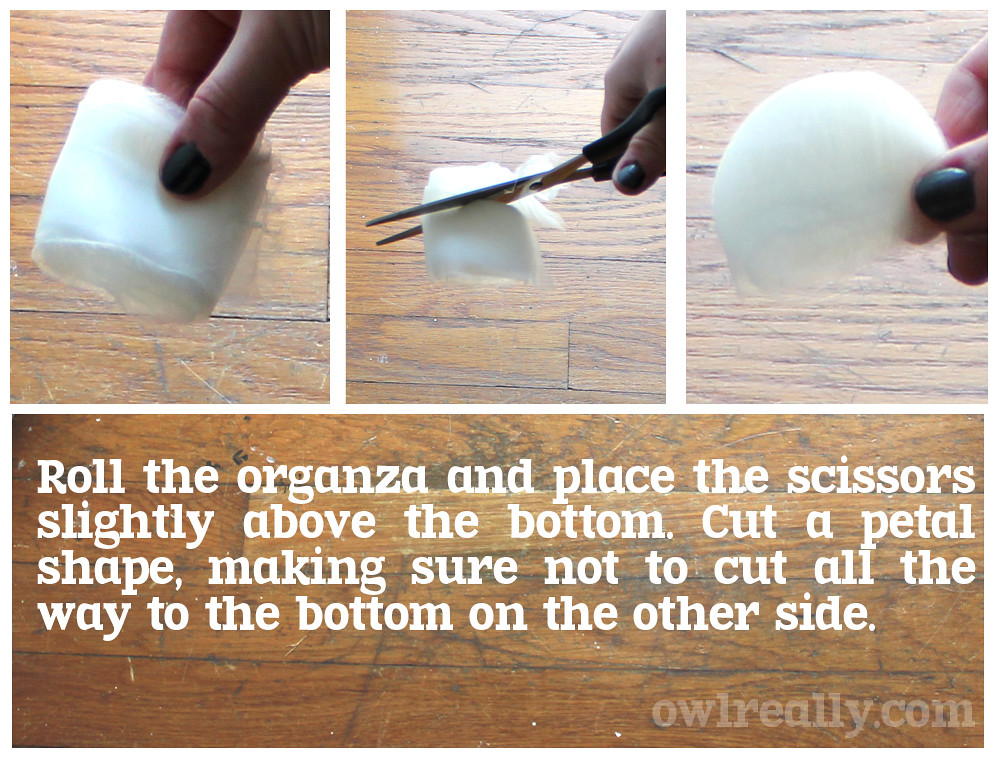
Cut a petal shape, similar to how you would cut connected paper dolls. The goal is to create a chain of petals, so you want to make sure not to cut all the way through the bottom of the organza roll on either side.

Step 4:

flower, fabric flower, diy, bouquet, bridal bouquet, bridal bouquet alternative, make your own bouquet, make your own wedding bouquet, make your own bridal bouquet, organza, easy, no-sew, no sew

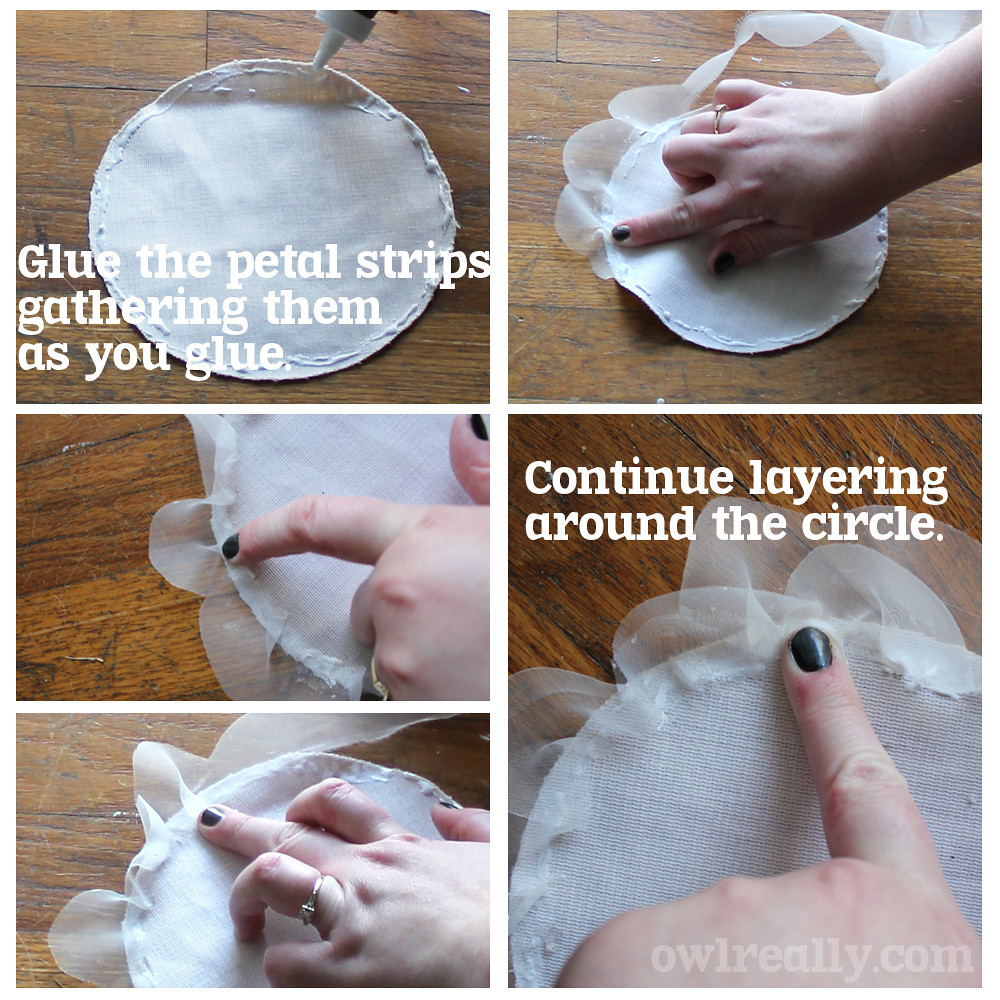
Apply glue around the circumference of your circle. I started with Aleene's Tacky Glue but ran into a lot of trouble with it. I switched to Fabri-Tac and it worked so much better. I highly recommend Fabri-Tac - it "grabs" the organza right away and stays tacky so that if you make it around the circle, you can actually press a new layer down using the same glue.

Place the bottom of a petal in the glue, pinching and gathering as you do to create volume. Continue pressing, pinching, gathering as you glue around the outside of the circle- there's not an exact science - you just want to make sure they have some volume and variations.

Continue around your fabric circle, gluing just the bottom of the organza petal strip down. You'll want your petals to be full and fluffy, so try not to glue them down and try to squeeze in as many layers as possible. Keep spiraling around the circle. It won't look pretty at first, but have faith - it will!

Step 5:

flower, fabric flower, diy, bouquet, bridal bouquet, bridal bouquet alternative, make your own bouquet, make your own wedding bouquet, make your own bridal bouquet, organza, easy, no-sew, no sew

Keep layering. I noticed I had some bare spots around the outer edge of my circle, so I gently separated the layers so I could add more petal strips in between them.

Your fabric flower is now complete! You can glue a pretty bauble in the center, or leave it as-is.

Step 6:

Attach the bouquet holder to the bouquet collar. There are many different types - I used the kind with the flat cylindrical flower foam, not the domed kind.

Glue the base of your fabric flower to the fabric of your bouquet collar.

Step 7:

flower, fabric flower, diy, bouquet, bridal bouquet, bridal bouquet alternative, make your own bouquet, make your own wedding bouquet, make your own bridal bouquet, organza, easy, no-sew, no sew

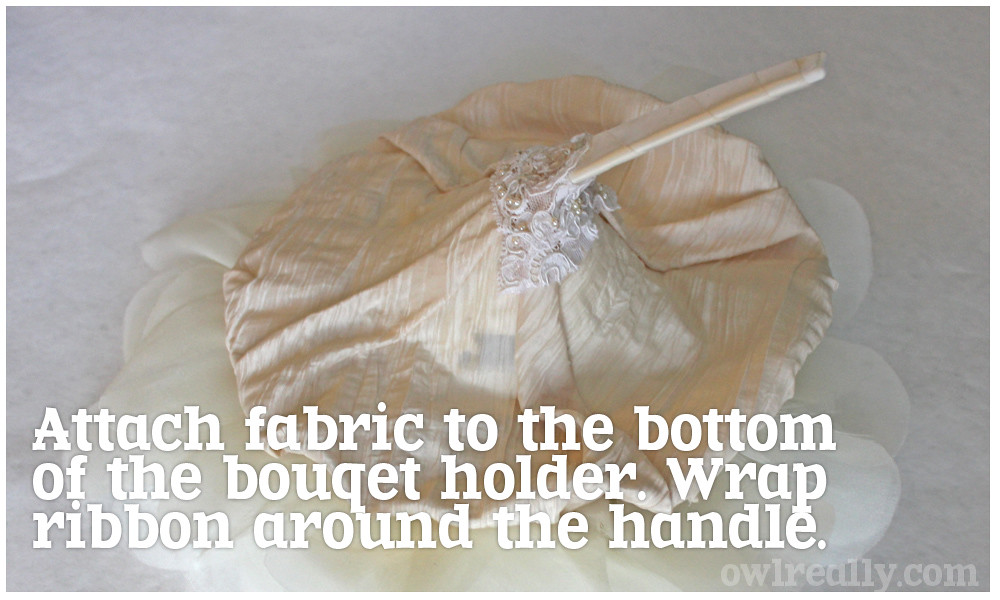
Take coordinating fabric and cut a small hole in the middle of it. Gather it up and around your bouquet collar, tucking your fabric under your first row of petals. Glue as you go. Wrap ribbon around the handle and add a bit of lace or pretty fabric to cover where the ribbon and fabric meet. The bottom might not be very pretty, but no one will see it! :)

Here is my bouquet in action:

flower, fabric flower, diy, bouquet, bridal bouquet, bridal bouquet alternative, make your own bouquet, make your own wedding bouquet, make your own bridal bouquet, organza, easy, no-sew, no sew

Want to know more about our wedding? You can read up on it and see more photos here!

I hope you enjoyed this tutorial! Please let me know if you make one for your wedding or other projects!


Linking to:
My Repurposed Life
Look What I Made
Yesterday On Tuesday
Freckled Laundry
Sundae Scoop
Think Pink Sundays
Whatever You Want Wednesdays

If you're new to Owl Really, welcome! Please check out my favorite posts and consider subscribing! :)

Wednesday, January 4, 2012

Favorite Finds: Rae's Hank Williams Bust


I recently connected with Rae of Say It Ain't So - we are fellow bloggers, lovers of estate sales, the Goodwill Outlet, and we even live in the same neighborhood and frequent the same sales! We haven't met yet, but I'm so excited to have a blog friend basically in my back yard who loves many of the same things that I love!

Rae has a great blog where she shares her amazing kitschy finds! Check it out!

I knew Rae would have an amazing favorite find and she definitely didn't disappoint. Read on to hear about her amazing Hank Williams bust - yes, you read that right - a Hank Williams bust! You never know what you'll find in Nashville!


What is your favorite find and where did you find it?

It is really hard to pick a favorite find, but a life sized bust of Hank Williams is one of the most amazing. The credit should really go to my husband, he was the one that fished it out a bin at the Goodwill Outlet. If you haven't been to one, at the Goodwill Outlet all the stuff is barely sorted and thrown into bins. You pay by the pound. You can find amazing stuff for pennies, but you have to look through a LOT of trash.


What were your first thoughts when you saw a lifesize Hank Williams bust??

Travis says "My first thought was, is that metal? Why is that here? Why hasn't anyone else grabbed this?" He then put it in our cart and as we continued our search through the bins everyone walking by was like "Oh! You are getting Hank!" They all passed him up because they were afraid he would be too expensive. I guess they didn't know that if you find something BIG (like a bowling ball, or a letter press type drawer, or a bust of Hank Williams) they will give it to you for 3 to 5 dollars.

Is that the strangest thing you've ever found at the Goodwill Outlet?

The bust is probably the weirdest thing. There is one just like it in the Hank Williams Museum in Montgomery Alabama. How did ours get to the Goodwill Outlet?

Where does it "live" now in your house?

We are big classic country fans so Hank now lives in our living room, right next to our tv unit. You can see him to the left of the Christmas tree. I want to find a vintage trunk for him to sit on.

Why do you love buying vintage kitsch?

Because it seems like for the same price of something crappily made and new from Target, I can get something awesome and sturdy from a thrift store! I love how vintage looks, especially if it is kistch. I would love it if every single thing in my house had a face on it. Or a poodle.


Rae, thanks so much for sharing about the thrill of the Goodwill Outlet and the amazing, unique items you can find there!


If you're new to Owl Really, welcome! Please check out my favorite posts and consider subscribing! :)